A lifestyle blog with a little bit of everything! Makeup and beauty, planning, recipes and so much more!
Showing posts with label Holiday. Show all posts
2/13/15
Lip Products for Valentine's Day!
Valentine's Day is tomorrow! Thinking about that special someone you're going to spend it with? Or maybe you're thinking about celebrating your single-dom and getting out for a girls night! Either way you are going to need a great makeup look! Personally, my favorite look for valentine's day is a pretty simple eye and a gorgeous pink or red lip! Not sure which lip product to choose? No worries! I've done the work for you! I've picked out 5 great, affordable drugstore lipsticks, in a variety of shades so no matter what look you're going for, you'll have the perfect lipstick! And Bonus! I've selected 3 glosses from my collection as well that I think would go great paired with the lipsticks I've chosen, or would be great on their own for a less bold look! So let's get into it!
1. Maybelline Vivid Rose- This is a great lipstick option if you're going out on the town with the girls, or having a day date with the man of your dreams. It's a bright, bold, look at me rose shade that brightens up your face! The formula on this lipstick is incredibly smooth, and majorly pigmented!
2. e.l.f. moisturizing lipstick in Rosy-Go-Round- I love these rose toned shades, can you tell? This one is a little more subdued than Vivid rose and that makes it more wearable in my opinion. If you're scared of a bright in your face rose toned lipstick, go with this one. It's just as beautiful but just a tad more demure!
3. Revlon Cherries in the snow- This is a gorgeous pink-y red that makes it incredibly beautiful and easier to wear than a true, tomato red! It's stunning on all skin tones and the formula is impeccable.
4. Revlon Lip Butter in Strawberry Shortcake- If you're looking for a gorgeous sweet blue toned pink, look no further. This one is a tad frosty, but super comfortable to wear and great for a sweet baby pink lip!
5. Wet n Wild Spotlight Red- Want that classic bold red lip? You can get it at a super affordable price with this beauty! It's a matte lipstick which makes it a tad drying but keeps it lasting for quite a while. You'll need a lip balm and a liner with this baby but if you're bold enough to pull it off, you won't be disappointed!
6. Julep Lively- This lip gloss from Julep is the prettiest rosy pink you ever did see. Pair it with any of the rose toned lipsticks above to add some shine or wear it alone for a perfect, subtle rose lip.
7. Nyx Butter Gloss in cherry pie- this is a great subtle red gloss that can be worn on it's own for an easier to pull off red lip, or layered with Spotlight red to add some glossy shine! The butter glosses from nyx have a great formula and a yummy smell!
8. e.l.f. lip color in pink- this baby lip lip gloss is great for a girly pink lip or can be layered on top of that pretty pink lip butter in strawberry cake for the perfect flirty, girly, glossy pink kiss!
10/12/14
Angel Costume: Outfit, makeup & nails
I went to a costume party last night, and I wanted to film a video on the makeup I did, but I didn't get a chance to film. So instead, I took a bunch of pictures and I thought I would write up a quick blog post on what I did. I dressed up as an angel. It was a quick costume I threw together from things I had at home on hand, and a few other things I picked up from walmart and Salvation Army. I had a lot of fun creating the costume and the makeup look to go with it!
It was a masquerade party, so I wanted to focus a lot on the eyes, since that's mostly what you could see. I also focused on my complexion, because an angel's skin is bound to be flawless!
For my makeup I used the following products:
Cover Girl Outlast Stay Fabulous 3-in-1 Foundation in Creamy Natural
Maybelline Fit Me Concealer in light
Elf High Definition Powder
Tarte Amazonian Clay 12 hour blush in exposed (on the back of my cheeks)
E.L.F. Natural Radiance Blush in Flushed (on the apples of my cheeks)
E.L.F. Baked Blush in Pinktastic (as a highlight on my cheekbones and browbone
Revlon PhotoReady Bronzer in Bronzed and Chic
NYX jumbo eyeshadow pencil in milk (as an eye shadow base)
Eyetini liquid eye shadow in ambrosia (as a base for my crease color)
Coastal Scents Hot Pot in M01 (all over the eye)
Coastal Scents Hot Pot in HP-ME14 (all over the lid)
E.L.F. Custom Eyes Eye shadow in moondust (in the crease as a blending out shade)
E.L.F. Custom Eyes Eye shadow in Purple (to darken up the crease and in the outer corner)
Urban Decay Eye shadow in Uzi (in the center of the eye lid to add some sparkle)
Chella Ivory Lace Highlighter (in my water line)
E.L.F. Cream Eyeliner in black (to line my upper lash line)
Wet n Wild Color Icon Eye shadow single in Panther (to smoke out my black liner)
L'oreal Voluminous Carbon Black Mascara
Kiss looks so natural lashes (cut in half)
Maybelline baby lips in pink punch
E.L.F. Luscious liquid lipstick in nude pink
E.L.F. Glitter Gloss in Golden Glitz (on the center of my lips)
My Costume:
Robe: a graduation gown I picked up at Salvation army for four bucks!
Mask: walmart
wings: walmart
white tights: walmart
white headband: forever 21
shoes: were a gift
Nails:
For my nails I used Julep's Dana, which is black light reactive and was a total hit at the party. And on top to add a little sparkle I did a coat of Julep's Paris.
Overall I was pleased with my costume! I hope you enjoyed!
It was a masquerade party, so I wanted to focus a lot on the eyes, since that's mostly what you could see. I also focused on my complexion, because an angel's skin is bound to be flawless!
Cover Girl Outlast Stay Fabulous 3-in-1 Foundation in Creamy Natural
Maybelline Fit Me Concealer in light
Elf High Definition Powder
Tarte Amazonian Clay 12 hour blush in exposed (on the back of my cheeks)
E.L.F. Natural Radiance Blush in Flushed (on the apples of my cheeks)
E.L.F. Baked Blush in Pinktastic (as a highlight on my cheekbones and browbone
Revlon PhotoReady Bronzer in Bronzed and Chic
NYX jumbo eyeshadow pencil in milk (as an eye shadow base)
Eyetini liquid eye shadow in ambrosia (as a base for my crease color)
Coastal Scents Hot Pot in M01 (all over the eye)
Coastal Scents Hot Pot in HP-ME14 (all over the lid)
E.L.F. Custom Eyes Eye shadow in moondust (in the crease as a blending out shade)
E.L.F. Custom Eyes Eye shadow in Purple (to darken up the crease and in the outer corner)
Urban Decay Eye shadow in Uzi (in the center of the eye lid to add some sparkle)
Chella Ivory Lace Highlighter (in my water line)
E.L.F. Cream Eyeliner in black (to line my upper lash line)
Wet n Wild Color Icon Eye shadow single in Panther (to smoke out my black liner)
L'oreal Voluminous Carbon Black Mascara
Kiss looks so natural lashes (cut in half)
Maybelline baby lips in pink punch
E.L.F. Luscious liquid lipstick in nude pink
E.L.F. Glitter Gloss in Golden Glitz (on the center of my lips)
My Costume:
Mask: walmart
wings: walmart
white tights: walmart
white headband: forever 21
shoes: were a gift
Nails:
For my nails I used Julep's Dana, which is black light reactive and was a total hit at the party. And on top to add a little sparkle I did a coat of Julep's Paris.
Overall I was pleased with my costume! I hope you enjoyed!
7/4/14
Happy Independence Day!
If you are one of my American readers, happy Independence Day! If not, happy Friday! I thought I would share my patriotic manicure with you today!
The red nails are Sinful Colors Sugar Sugar with Julep's America the Beautiful on top. The Blue Nails are Sally Hansen Hard as Nails Xtreme Wear in Blue It with New York Color Disco Inferno Top Coat. The white nail is Julep Brigitte with accents of Sugar Sugar, Blue It, Sally Hansen Celeb City and a bit of Disco Inferno right in the middle. I love the way these turned out!
2/14/14
My Valentine's Day Manicure
Hey guys!Happy Valentine's Day! I feel like all I ever post is nail polish related things, and this is no exception! I promise to get back into posting reviews and things of other products. Eventually. But fo now, I wanted to share my Valentine's Day Manicure with you!!
I went with a super simple, very pretty mani this year. I started out by painting all of my nails with one of my new favorite pinks, Zoya's Dot. I got this polish in my Ipsy bag (if you want to see what else I received in my bag, check out my video here) and it's the perfect milky baby pink. It just reminds me of strawberry milk. The formula on this polish is amazing. I didn't find it streaky or difficult to work with at all, and I was able to get it opaque in just two coats, practically unheard of for a pastel! Once the polish was dry, I did a single stamped accent nail. I used the BM02 plate from Bundle Monster and stamped using Wet n Wild Megalast polish in "I Red a Good Book" Because it was just a single thin coat of polish, it turned out a dark pink color, which I think looks perfect with "Dot".I topped it off with Sally Hansen's Strengthening Top Coat for some beautiful shine, All in all I am quite pleased with how it turned out!
12/18/13
Advent Calendar Nail Challenge Day 16: Inspired by a Christmas Song
Yep, I am still a couple of days behind! Sorry! But, I am super excited about the theme for Day 16! Inspired by a Christmas Song. One of my favorite Christmas songs is "Silver and Gold" by Burl Ives. I couldn't help but do a silver and gold manicure!
After I applied my base coat to protect my nails, I applied two coats of Julep's "Amity" Technically this is a white gold shade, not quite silver, but I feel like a super metallic silver color wouldn't have worked as nicely with gold. Once "Amilty" was completely dry, I sponged the gold I chose to use, China Glaze's "Mingle with Kringle" on just the tips. Then when that was dry, I added just a bit of chunky gold glitter, Elf's "Gold Star" to the tips of my nails by just dabbing the nail polish brush. Overall I think it's a beautiful manicure. I love the mix of silver and gold and the added bling that the chunky glitter adds. Gradient manicures are so fun, aren't they? Everytime I look down at my nails, I start singing that song, too, which is really putting me in the Holiday Spirit! It's just a week until Christmas! I hope you're all having an amazing Holiday season so far, and I hope you'll join me tomorrow for my next themed manicure for this challenge! See ya soon!
12/17/13
Advent Calendar Nail Challenge Day 15: Something Cozy
I was stumped for quite a while on what to do for the theme something cozy. So I went ahead and typed "Something Cozy" into google images and the first thing that popped up was a picture of a ball of yarn. That inspired me! I couldn't actually paint a ball of yarn onto my nails, because as you've seen, my nail art skills are abysmal. So I went another route.
I opted to go with the Sally Hansen Fuzzy Coat polish in "All yarned up" for two reasons. One, because yarn is cozy. And two becuase fuzzy coats are cozy too. Yes, it's corny. It's ok you can laugh. Regardless, I like how this mani turned out. For undies I used The Ulta Salon Formula Nail Lacquer in "Set the Nude" Then I applied two coats of "All Yarned Up" and to finish the look I applied the Elf matte top coat for a nice change to my usual ultra shiny manicures. What do you think?
12/16/13
Advent Calendar Nail Challenge Day 14: Glitter!
We're not even going to talk about how far behind I am in this challenge. We're just going to get right into the manicure I created for the theme for day 14: Glitter!
I started out with a base coat and then painted my nails with a black polish. I used Wet n Wild Wild Shine in Black Creme. Then I added two coats of one of my favorite glitter polishes of all time. It's Revlon's Scandalous . It's absolutely beautiful and I searched high and low for it when I first bought it. It's a dupe for a Deborah Lippman polish, and I think it's stunning this time of year!
12/14/13
Advent Calendar Nail Challenge Day 13: Snow
The theme for Day 13 of the challenge is snow! I really wanted to do another stamping mani and here's what I came up with! I love this snowflake manicure!!
I started out with a white base color. I used Sinful Colors "Snow me White." Then, using the bundle monster image plate number BM14, I stamped on the snow flake design in a random pattern on each nail with Sinful Colors "Endless Blue" Then when that was dry I added a Shades of the Season Glitter polish. They don't have names, but this one is a really pretty iridescent glitter that looks so beautiful with this manicure. Just like fresh sparkling white snow. Considering we got 8 inches of snow dumped on us today, this seemed like an appropriate manicure!
Be sure to check back again and see what I come up with for the rest of this challenge. :)
I started out with a white base color. I used Sinful Colors "Snow me White." Then, using the bundle monster image plate number BM14, I stamped on the snow flake design in a random pattern on each nail with Sinful Colors "Endless Blue" Then when that was dry I added a Shades of the Season Glitter polish. They don't have names, but this one is a really pretty iridescent glitter that looks so beautiful with this manicure. Just like fresh sparkling white snow. Considering we got 8 inches of snow dumped on us today, this seemed like an appropriate manicure!
Be sure to check back again and see what I come up with for the rest of this challenge. :)
12/8/13
Advent Calendar Nail Challenge: Days 7 and 8
I was so busy yesterday that I didn't find a free moment to photograph my nails and write up the blog post. I did find time to create the mani though. It's laughable, but I thought I would share it anyway. The theme yesterday was Ornaments, and so I attempted to free hand an ornament on each nail. It looks like my 5 year old did my nails, but hey, at least I tried!
I used my usual black and white. Wet n Wild Wild Shine "Black Creme" and "French White Creme" For the red, I used China Glaze "Poinsettia". The Green is China Glaze "Holly-Day" The Gold ornament is done in China Glaze "Gold Fusion". The Silver Ornament is Milani "Tricky Treat" and the Blue ornament in the Sally Hansen complete Salon Manicure in "Nightwatch"
Day 8's theme for the challenge is Starry Night"
For this design I used the Sally Hansen Complete Salon Manicure polish in "Nightwatch" as the base. It's a bit darker than it shows in the photos. Then, as accent nails I painted the Step 3 polish from the Kiss Gradation Set in Film Noir. It's a pretty holographic glitter polish that I think gives the look of a night sky spattered in stars. Then, I used the Konad image plate number m3 and stamped the star design using wet n wild wild shine "french white creme" on the remaining nails. I love the overall look.
So there ya have my designs for days 7 and 8. Be sure to check back tomorrow when I attempt a design for day 9, when the theme will be pine!
I used my usual black and white. Wet n Wild Wild Shine "Black Creme" and "French White Creme" For the red, I used China Glaze "Poinsettia". The Green is China Glaze "Holly-Day" The Gold ornament is done in China Glaze "Gold Fusion". The Silver Ornament is Milani "Tricky Treat" and the Blue ornament in the Sally Hansen complete Salon Manicure in "Nightwatch"
Day 8's theme for the challenge is Starry Night"
For this design I used the Sally Hansen Complete Salon Manicure polish in "Nightwatch" as the base. It's a bit darker than it shows in the photos. Then, as accent nails I painted the Step 3 polish from the Kiss Gradation Set in Film Noir. It's a pretty holographic glitter polish that I think gives the look of a night sky spattered in stars. Then, I used the Konad image plate number m3 and stamped the star design using wet n wild wild shine "french white creme" on the remaining nails. I love the overall look.
So there ya have my designs for days 7 and 8. Be sure to check back tomorrow when I attempt a design for day 9, when the theme will be pine!
10/28/13
Mani Monday: Halloween
Hey guys! I am so sorry that I haven't been participating in Mani Monday lately. I've just been feeling rather uninspired lately. But no more, this week's theme is Halloween and I am fired up! So fired up, in fact, that today kicks off the first of 4 Halloween manis that I have ideas for. If everything goes as planned, hopefully I will post a new halloween themed mani everyday until Halloween!But for now let's show off this one for Mani Monday!
How cute are these adorable little glow in the dark ghost face nails? And super easy! I started out by painting two coats of the Wet n Wild Wild Shine polish in French White, and then topped that with a coat of the Sinful Colors Glow in the dark Polish. Once it was all dry I just used a dotting tool and added the eyes and mouths using Sinful Colors Black on Black. Easy peasy. These are so cute, and super awesome looking in the dark! Love them!
I hope you'll pop by tomorrow and see my next Halloween themed mani! Fingers crossed it turns out as cute in reality as it looks in my head! haha. Thanks for stopping by!
10/22/13
Costume Party: Outift, Face and Nails!
10/16/13
Halloween themed Manicure
It's about the dreariest day possible. It's overcast and chilly and the epitome of fall here in southeast Michigan. That means it's not great lighting for taking photographs, but I wanted to share the mani that I did on myself last night. I wanted to do something sort of halloween themed, but I didn't have time to do a lot of stamping or nail art. So I decided to do something simple, and I love the way it turned out!
On my pinkie and thumb I have 2 coats of Sinful Colors Black on Black. It's a nice, shiny black cream polish. There is also one coat of Sinful Colors Black on Black under a coat of Sinful Colors Black Magic.Black Magic is a clear base chock full of medium sized orange glitter and charcoal colored micro glitter. Black Magic is part of Sinful Colors Halloween line of polishes and it's stunning! On my pointer finger and middle finger there are two coats of Wet n Wild 9.0.2.1.orange. It's a gorgeous sheer orange with tons of gold shimmer running through it.
Together, I think this makes a perfect black and orange halloween themed mani. It's a great manicure that doesn't require any nail art skills, and because the dense glitter polish is only one the one nail, it should be relatively easy to get off.
Hopefully you enjoyed this and maybe got an idea for a cute super easy halloween manicure! Stay tuned for more halloween themed manis as the month progresses! See ya again soon!
On my pinkie and thumb I have 2 coats of Sinful Colors Black on Black. It's a nice, shiny black cream polish. There is also one coat of Sinful Colors Black on Black under a coat of Sinful Colors Black Magic.Black Magic is a clear base chock full of medium sized orange glitter and charcoal colored micro glitter. Black Magic is part of Sinful Colors Halloween line of polishes and it's stunning! On my pointer finger and middle finger there are two coats of Wet n Wild 9.0.2.1.orange. It's a gorgeous sheer orange with tons of gold shimmer running through it.
Together, I think this makes a perfect black and orange halloween themed mani. It's a great manicure that doesn't require any nail art skills, and because the dense glitter polish is only one the one nail, it should be relatively easy to get off.
Hopefully you enjoyed this and maybe got an idea for a cute super easy halloween manicure! Stay tuned for more halloween themed manis as the month progresses! See ya again soon!
9/17/13
Elf Disney Villains 2013 Collection: First Impression and Swatches!
If you've been reading my blog for a while then you might remember my excitement about the E.L.F. Villainous Villains Limited edition collection of products from last year. Well, they're back, baby, and better than ever. This year, E.L.F. has come out with FOUR villain look books (last year only three villains were featured- Maleficent, Cruella and The Wicked Queen. This year they added Ursula into the mix) as well as a collection of mini nail polishes. These products are all exclusive to walgreens. Last year, these were incredibly difficult for me to find. I searched high and low, went to about five different walgreens and finally had a very kind saleslady hold them for me until my husband could get down there, and he bought the very last ones! This year, I had zero trouble finding these babies! I walked into my local walgreens and spotted them as soon as I walked through the automatic doors!
The look books were on display along with the nail polishes from Ellf, as well as other dsney villains themed products including false lashes from ardell, some hair things and some makeup bags. Let me tell you, I LOVE the disney villains, and it was so hard not to put one of everything in my cart!
But, I didn't. I pushed away the urge to buy everything and walked out with just one of the Disney Villains Look Books. I chose Ursula, since there wasn't a book available for her last year. And because I am a sucker for purple eyeshadows!
Isn't it just gorgeous! These books are quite a bit bigger than the ones from last year and feature white packaging with a gorgeous watercolor style image of the villain, in this case, Ursula. The packaging on this is so pretty and stylized. I love it! The book opens up in a sort of french door style (I am blanking on how else to describe it) and on either side of the products, there are written instructions on how to create both a day look, and a night look. These tutorials aren't as in-depth as the ones from the books last year, but useful nonetheless. I will be doing a separate post later on the looks that can be created, so be on the lookout for that!
Each of the look books comes with 1 eyelid primer, 6 eyeshadows, 1 brightening eyeliner, 1 liquid eyeliner, 1 mascara, 1 lip color ans 1 eyeshadow brush. Unlike last year's books, where the products were built in and couldn't be removed, these are all individual products that can be removed, which makes application super easy. Let's go over each of the products included in this book and look at them a little closer!
Elf Lengthening and Defining Mascara in black- This is the mascara from Elf's essential line. It can be purchased from their website for $1. I have never actually used this mascara before, so I am interesting in trying it out. The wand on this mascara is a regular bristle wand, not a rubberized one. Normally I prefer the rubberized wands, but we shall see. The head of this wand is also a bit smaller than some of the other wands I have tried previously, so that should be helpful in really getting in close to the lashline. I will have a full review on this mascara in an upcoming post.
Elf Brightening Eyeliner in Black- This is the eyeliner from Elf's essential line. It can be purchased from Elf's website for $1. That's for the full size. This is a mini travel size pencil. This isn't the blackest eyeliner ever, but it's nice and soft and easy to use. You can smudge it easily which makes it nice.
Elf Liquid Eyeliner in Midnight- I really like Elf's liquid eyeliner. This is from Elfs essential line as well and can also be purchased from their website for one dollar. I find that elf's liquid liners are easy to apply (well, as easy as liquid eyeliner is to apply) and dries relatively quickly, and lasts for quite a while! I don't find that it flakes on me, though I have heard that complaint from others. Still, it's a nice addition to the set.
Elf Eyelid Primer- this is one of my holy grail products from Elf. It's just $1 from their essential line and it works just as well as higher end primers, on me. I find that it really helps to make colored eye shadows pop, which makes it a perfect addition to this colorful collection.
Elf professional eyeshadow brush- This is another one of my holy grail items from elf. This brush is fantastic, especially for it's price tag, which is $1 on Elf's website. It's a flat shader brush that is perfect for laying down color. I highly recommend this, and I am so excited to have an extra!
Elf Lip Color- This is an absolutely beautiful opaque lip cream. The one in the Ursula look book is a gorgeous mid-toned pink that isn't too muted or too bright. I found this lip color to be incredibly pigmented, long lasting (for a gloss) and very glossy. I love this!
The eye shadows that are included in the Ursula Look Book are:
Coral- a shimmery pale lavender shade
Sea witch- a bright, matte fuchsia purple shade
Shell- a gorgeous green with a satin finish
Kiss the Girl- a super pigmented midtoned brown
Triton- a brighter mid-toned purple with a matte finish
Bewitched- a matte charcoal gray
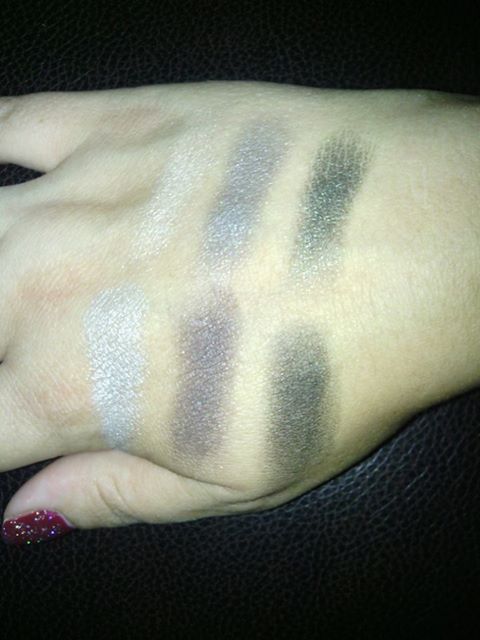
Sometimes Elf's eyeshadows can be quite hit or miss, but I found, overall, the quality of these eyeshadows to be quite good! You can see, below, the swatches which are done on bare skin. I am certain that with an eye primer, these would really pop and be gorgeous! I apologize for my photos, which are looking quite washed out, but you can get an idea on pigmentation here. And just look at that gorgeous brown shade, called Kiss the girl.
So there ya have it. That's the Ursula look book. I was so pleased to be able ti find this and add it to my collection of books from last year!
But wait! There's more!
My amazing husband got me a present. I was more than happy with my ursula book, so he got me my next favorite Disney Villain! Maleficent!!
This book comes with all the same products as the Ursula one. Only differences are, the eye shadows and the lip color.
The Maleficent Look book comes with these eye shadows:
Flora- a cream color
Fauna- a sort of khaki color with a gorgeous sheen
Spell- a gorgeous shimmery green
Deep Sleep- a silvery light green shade
Thorns- a dark ruddy brown
Raven Black- a matte black
You can see in the photo below some are more pigmented than others and the black is a bit chalky but these can all be worked with!
And the Maleficent Lip Color is this gorgeous red:
Overall I think, of the look books I have tried, this is a great collection! Heck, just the novelty alone makes this worth the $9.99 price tag to me, and the products are all product I will use!! I am going to try very hard to contain myself and not buy the other products in this collection, but its so hard!! Which Disney villain is your favorite? I would love to hear from you! Leave me a comment on this post, or else use the contact card below to get in touch!! Thanks for stopping by, guys, and be on the lookout for posts on the looks I plan to create with these sets!
The look books were on display along with the nail polishes from Ellf, as well as other dsney villains themed products including false lashes from ardell, some hair things and some makeup bags. Let me tell you, I LOVE the disney villains, and it was so hard not to put one of everything in my cart!
But, I didn't. I pushed away the urge to buy everything and walked out with just one of the Disney Villains Look Books. I chose Ursula, since there wasn't a book available for her last year. And because I am a sucker for purple eyeshadows!
![]() | |
|
Isn't it just gorgeous! These books are quite a bit bigger than the ones from last year and feature white packaging with a gorgeous watercolor style image of the villain, in this case, Ursula. The packaging on this is so pretty and stylized. I love it! The book opens up in a sort of french door style (I am blanking on how else to describe it) and on either side of the products, there are written instructions on how to create both a day look, and a night look. These tutorials aren't as in-depth as the ones from the books last year, but useful nonetheless. I will be doing a separate post later on the looks that can be created, so be on the lookout for that!
Each of the look books comes with 1 eyelid primer, 6 eyeshadows, 1 brightening eyeliner, 1 liquid eyeliner, 1 mascara, 1 lip color ans 1 eyeshadow brush. Unlike last year's books, where the products were built in and couldn't be removed, these are all individual products that can be removed, which makes application super easy. Let's go over each of the products included in this book and look at them a little closer!
Elf Lengthening and Defining Mascara in black- This is the mascara from Elf's essential line. It can be purchased from their website for $1. I have never actually used this mascara before, so I am interesting in trying it out. The wand on this mascara is a regular bristle wand, not a rubberized one. Normally I prefer the rubberized wands, but we shall see. The head of this wand is also a bit smaller than some of the other wands I have tried previously, so that should be helpful in really getting in close to the lashline. I will have a full review on this mascara in an upcoming post.
Elf Brightening Eyeliner in Black- This is the eyeliner from Elf's essential line. It can be purchased from Elf's website for $1. That's for the full size. This is a mini travel size pencil. This isn't the blackest eyeliner ever, but it's nice and soft and easy to use. You can smudge it easily which makes it nice.
Elf Liquid Eyeliner in Midnight- I really like Elf's liquid eyeliner. This is from Elfs essential line as well and can also be purchased from their website for one dollar. I find that elf's liquid liners are easy to apply (well, as easy as liquid eyeliner is to apply) and dries relatively quickly, and lasts for quite a while! I don't find that it flakes on me, though I have heard that complaint from others. Still, it's a nice addition to the set.
![]() |
| Liquid liner in midnight, brightening eye liner in black |
Elf Eyelid Primer- this is one of my holy grail products from Elf. It's just $1 from their essential line and it works just as well as higher end primers, on me. I find that it really helps to make colored eye shadows pop, which makes it a perfect addition to this colorful collection.
Elf professional eyeshadow brush- This is another one of my holy grail items from elf. This brush is fantastic, especially for it's price tag, which is $1 on Elf's website. It's a flat shader brush that is perfect for laying down color. I highly recommend this, and I am so excited to have an extra!
Elf Lip Color- This is an absolutely beautiful opaque lip cream. The one in the Ursula look book is a gorgeous mid-toned pink that isn't too muted or too bright. I found this lip color to be incredibly pigmented, long lasting (for a gloss) and very glossy. I love this!
![]() |
| Ursula Lip Color |
The eye shadows that are included in the Ursula Look Book are:
Coral- a shimmery pale lavender shade
Sea witch- a bright, matte fuchsia purple shade
Shell- a gorgeous green with a satin finish
Kiss the Girl- a super pigmented midtoned brown
Triton- a brighter mid-toned purple with a matte finish
Bewitched- a matte charcoal gray
Sometimes Elf's eyeshadows can be quite hit or miss, but I found, overall, the quality of these eyeshadows to be quite good! You can see, below, the swatches which are done on bare skin. I am certain that with an eye primer, these would really pop and be gorgeous! I apologize for my photos, which are looking quite washed out, but you can get an idea on pigmentation here. And just look at that gorgeous brown shade, called Kiss the girl.
![]() |
| Coral, Sea Witch, Shell Kiss the Girl, Triton, bewitched |
So there ya have it. That's the Ursula look book. I was so pleased to be able ti find this and add it to my collection of books from last year!
But wait! There's more!
My amazing husband got me a present. I was more than happy with my ursula book, so he got me my next favorite Disney Villain! Maleficent!!
![]() |
| Elf Disney Villains Maleficent Look Book |
This book comes with all the same products as the Ursula one. Only differences are, the eye shadows and the lip color.
The Maleficent Look book comes with these eye shadows:
Flora- a cream color
Fauna- a sort of khaki color with a gorgeous sheen
Spell- a gorgeous shimmery green
Deep Sleep- a silvery light green shade
Thorns- a dark ruddy brown
Raven Black- a matte black
You can see in the photo below some are more pigmented than others and the black is a bit chalky but these can all be worked with!
![]() |
| Flora, Fauna, Spell Deep Sleep, Thorns, Raven Black |
And the Maleficent Lip Color is this gorgeous red:
![]() |
| Maleficent Lip Color |
Overall I think, of the look books I have tried, this is a great collection! Heck, just the novelty alone makes this worth the $9.99 price tag to me, and the products are all product I will use!! I am going to try very hard to contain myself and not buy the other products in this collection, but its so hard!! Which Disney villain is your favorite? I would love to hear from you! Leave me a comment on this post, or else use the contact card below to get in touch!! Thanks for stopping by, guys, and be on the lookout for posts on the looks I plan to create with these sets!
6/3/13
May 2013 Polish Picks!
I know in my last blog I talked about how I was going to try to bring more non-related polish posts here, and I swear, that is the intent. If you are looking for more than just polish content, and are impatient with the slow pace of this blog (I am sorry I swear it will get better) you can always check out my youtube channel. I try to post three videos a week. Generally on Monday, Wednesday and Friday, and there's a wide variety of topics covered there. You can find it here!
Now that that little disclaimer is out of the way, it's time to share with you all my polish picks for May. These are all the manis I wore in May, and there are a ton of polishes to get through, so let's just jump right into it!
The first mani that I am going to share with you all is a bright bubblegum pink polish from the wet n wild megalast line of polishes. I have raved to you guys on and on about this brand in the past, so I will spare you the details of how much I adore the brush and formula, and simply state that this pretty pink is another home run from the line. It's a nice cream formula that glides on like a dream. And for a bit of sparkle, I added a coat of a shades of the season polish. It's a pink and holographic glitter top coat that you can't really see much in the picture, but it made for a gorgeous mani! Not the easiest to remove, but with the foil method, it didn't give me much trouble!
One of my goals for the month of May was to try out some of the polishes that have been sitting on my shelf for a while that I hadn't used yet. This is one of those polishes. It's a pretty sage green with a sort of metallic shift to it, and it's Sage in the City from the Wet n Wild Fast Dry line. I don't like the fast dry polishes quite as much as the megalast polishes from wet n wild, but they are still pretty good. They do dry relatively fast, and they seem to all be named for television shows, which is fun. This sage green was very pretty, though I am not sure it really suits my skin tone. It was definitely something different than what I usually wear, and I am sure that it will get a lot of use in the future, maybe as nail art, or just an accent nail, since it's not the best color ever on me. The formula was very nice, and applied easily so that's a big plus!
I apologize for the very bad quality photo above. I took this photo immediately after polishing before I cleaned up the edges and before I even put on a top coat. I wanted you guys to be able to see how shiny this polish was all on it's own. And the color is amazing! This is Through the grapevine by wet n wild from their megalast collection. It's a gorgeous grape purple that I was instantly drawn to when I Saw it in the store. This applied beautifully, was opaque in one coat, and the color is just beautiful. One of my favorite polishes from my ever growing collection of wet n wild megalast polishes!
This brings us to mid month when I got my ipsy glam bag for May. Inside was this little beauty. This is Zoya's Blu from their spring 2013 collection. It is a gorgeous pastel baby blue. This polish applied like a dream! I had never tried zoya polishes before. Mainly because of their 8 dollar price tag! I like to keep my polish purchases to the 5 dollars or less side of things. But, Blu's formula sold me, and I may just be picking up a couple more polishes from Zoya in the near future to try! I liked this a lot!
This photo doesn't do this polish that I wore on my toes for May justice at all. I wish I had gotten a better photograph, but this is a cult favorite polish, so I am sure there's tons of swatches online if you are interested in a better look. This is China Glaze's Flip Flop Fantasy. It's a bright neon pinky-orange that is perfect for summer. This polish is matte, as most neons are, so you need a top coat if you are interested in that shiny look. I didn't think that was necessary on my toes, though, so I am wearing it matte and it makes me look soooo tan! It's a great bonus. I love this polish, especially for the toes, and I highly recommend it if you're in the market for a great summer pedi color!
The next color I wore on my fingernails is the sinful colors polish in timbleberry. It's a darker pink color that I really like a lot. My husband actually picked this polish out, and I did an emergency mani in the car, which is why the paint job is terrible, but the color is beautiful, the formula was great, and I have no complaints. You know how much I love sinful colors polishes if you have been reading my blog awhile, and this one is one of my faves!
Next up is a color that I think is great for summer! It's another wet n wild fast dry polish in the color 9.0.2.1. orange. It's a nice mid toned orange with a ton of cold shimmer running through it. It's not your average nail polish for sure, and I got quite a few compliments when I wore this one. I think this would be an awesome polish for the toes as well, at the beach! The formula on this was great Dried super fast and lasted for a good four days before it started to wear a bit around the tips of the nail. I was so impressed with the lasting power!
I saw a manicure on someone (and of course, I can't remember now who it was, sorry) on youtube, and it was a sort of turqoise green polish with a silver accent nail and decided to re-create it. I used the color Rise and shine from sinful colors on my main nails. Now this looks blue in the picture, and no matter what light I tried to photograph it in, it looked blue, but this polish is not blue. It's a sort of bright green with a lot of blue in it. It's a beautiful sort of st patrick's day shamrock green, if you get what I am saying. And it's a beautiful polish. It applied sort of sheer, but three coats got it opaque! And then for the accent nail I used Sally Hansen Hard as Nails Xtreme Wear polish in the color celeb city. It's just a really nice metallic silver. And then to add just a hint of something extra I used a silver glitter polish from shades of the seasons on top. I LOVED the way this turned out!
My memorial day nails are next. I decided to keep that same beautiful silver accent nail, and just spice up the other nails. The blue I used pn my pointer and pinkie fingers is an Elf polish called Dark Navy, and on top of that I used 2 coats of China Glaze's mosaic madness which is just a blue and black chunky glitter polish. I really wanted sparkle for this festive mani! The red I used is WEt n Wild Megalast in I red a good book, and I used a red shades of the season glitter polish on top for that bit of bling. I liked this a lot. It looks really sloppy in the photo, but it looked much better in real life. Elf's dark navy was a mini polish from a set that I got a while back, and it was a bit thick and hard to wrk with, but the rest of the polishes applied just dandy and the overall finished look was great!
Lastly I went for some super simple nail art. I applied A Julep polish in Dendrie as my base color. It's a beautiful cream formula dove grey color. And then I used a dotting tool that I got from amazon (a set of 5 dotting tools cost me about two dollars shipped) and did some fun polka dots in the color coral reef from sally hansen xtreme wear. The grey from julep applied nicely. There were a couple bubbles, but nothing unmanageable. I have found that in general, I am not crazy about Julep polishes. Their formula is really inconsistent. Sometimes you get an amazing polish, and other times it's thick and hard to work with. This was somewhere in between. I like this one pretty well. The color is fantastic. Coral reef is a gorgeous coral color that is just beautiful and applies wonderfully. I have yet to be disappointed with a sally hansen xtreme wear polish. This was just another hit!
So that is all of my polish picks for the month of May! Hope you all enjoyed this and maybe got some ideas for polishes to add to your collection! I will be back soon with more blog posts, and in the meantime, as I said above, be sure to check out my youtube channel! I would love to have you as a subscriber! I heart you guys all!
Now that that little disclaimer is out of the way, it's time to share with you all my polish picks for May. These are all the manis I wore in May, and there are a ton of polishes to get through, so let's just jump right into it!
The first mani that I am going to share with you all is a bright bubblegum pink polish from the wet n wild megalast line of polishes. I have raved to you guys on and on about this brand in the past, so I will spare you the details of how much I adore the brush and formula, and simply state that this pretty pink is another home run from the line. It's a nice cream formula that glides on like a dream. And for a bit of sparkle, I added a coat of a shades of the season polish. It's a pink and holographic glitter top coat that you can't really see much in the picture, but it made for a gorgeous mani! Not the easiest to remove, but with the foil method, it didn't give me much trouble!
One of my goals for the month of May was to try out some of the polishes that have been sitting on my shelf for a while that I hadn't used yet. This is one of those polishes. It's a pretty sage green with a sort of metallic shift to it, and it's Sage in the City from the Wet n Wild Fast Dry line. I don't like the fast dry polishes quite as much as the megalast polishes from wet n wild, but they are still pretty good. They do dry relatively fast, and they seem to all be named for television shows, which is fun. This sage green was very pretty, though I am not sure it really suits my skin tone. It was definitely something different than what I usually wear, and I am sure that it will get a lot of use in the future, maybe as nail art, or just an accent nail, since it's not the best color ever on me. The formula was very nice, and applied easily so that's a big plus!
I apologize for the very bad quality photo above. I took this photo immediately after polishing before I cleaned up the edges and before I even put on a top coat. I wanted you guys to be able to see how shiny this polish was all on it's own. And the color is amazing! This is Through the grapevine by wet n wild from their megalast collection. It's a gorgeous grape purple that I was instantly drawn to when I Saw it in the store. This applied beautifully, was opaque in one coat, and the color is just beautiful. One of my favorite polishes from my ever growing collection of wet n wild megalast polishes!
This brings us to mid month when I got my ipsy glam bag for May. Inside was this little beauty. This is Zoya's Blu from their spring 2013 collection. It is a gorgeous pastel baby blue. This polish applied like a dream! I had never tried zoya polishes before. Mainly because of their 8 dollar price tag! I like to keep my polish purchases to the 5 dollars or less side of things. But, Blu's formula sold me, and I may just be picking up a couple more polishes from Zoya in the near future to try! I liked this a lot!
This photo doesn't do this polish that I wore on my toes for May justice at all. I wish I had gotten a better photograph, but this is a cult favorite polish, so I am sure there's tons of swatches online if you are interested in a better look. This is China Glaze's Flip Flop Fantasy. It's a bright neon pinky-orange that is perfect for summer. This polish is matte, as most neons are, so you need a top coat if you are interested in that shiny look. I didn't think that was necessary on my toes, though, so I am wearing it matte and it makes me look soooo tan! It's a great bonus. I love this polish, especially for the toes, and I highly recommend it if you're in the market for a great summer pedi color!
The next color I wore on my fingernails is the sinful colors polish in timbleberry. It's a darker pink color that I really like a lot. My husband actually picked this polish out, and I did an emergency mani in the car, which is why the paint job is terrible, but the color is beautiful, the formula was great, and I have no complaints. You know how much I love sinful colors polishes if you have been reading my blog awhile, and this one is one of my faves!
Next up is a color that I think is great for summer! It's another wet n wild fast dry polish in the color 9.0.2.1. orange. It's a nice mid toned orange with a ton of cold shimmer running through it. It's not your average nail polish for sure, and I got quite a few compliments when I wore this one. I think this would be an awesome polish for the toes as well, at the beach! The formula on this was great Dried super fast and lasted for a good four days before it started to wear a bit around the tips of the nail. I was so impressed with the lasting power!
I saw a manicure on someone (and of course, I can't remember now who it was, sorry) on youtube, and it was a sort of turqoise green polish with a silver accent nail and decided to re-create it. I used the color Rise and shine from sinful colors on my main nails. Now this looks blue in the picture, and no matter what light I tried to photograph it in, it looked blue, but this polish is not blue. It's a sort of bright green with a lot of blue in it. It's a beautiful sort of st patrick's day shamrock green, if you get what I am saying. And it's a beautiful polish. It applied sort of sheer, but three coats got it opaque! And then for the accent nail I used Sally Hansen Hard as Nails Xtreme Wear polish in the color celeb city. It's just a really nice metallic silver. And then to add just a hint of something extra I used a silver glitter polish from shades of the seasons on top. I LOVED the way this turned out!
My memorial day nails are next. I decided to keep that same beautiful silver accent nail, and just spice up the other nails. The blue I used pn my pointer and pinkie fingers is an Elf polish called Dark Navy, and on top of that I used 2 coats of China Glaze's mosaic madness which is just a blue and black chunky glitter polish. I really wanted sparkle for this festive mani! The red I used is WEt n Wild Megalast in I red a good book, and I used a red shades of the season glitter polish on top for that bit of bling. I liked this a lot. It looks really sloppy in the photo, but it looked much better in real life. Elf's dark navy was a mini polish from a set that I got a while back, and it was a bit thick and hard to wrk with, but the rest of the polishes applied just dandy and the overall finished look was great!
Lastly I went for some super simple nail art. I applied A Julep polish in Dendrie as my base color. It's a beautiful cream formula dove grey color. And then I used a dotting tool that I got from amazon (a set of 5 dotting tools cost me about two dollars shipped) and did some fun polka dots in the color coral reef from sally hansen xtreme wear. The grey from julep applied nicely. There were a couple bubbles, but nothing unmanageable. I have found that in general, I am not crazy about Julep polishes. Their formula is really inconsistent. Sometimes you get an amazing polish, and other times it's thick and hard to work with. This was somewhere in between. I like this one pretty well. The color is fantastic. Coral reef is a gorgeous coral color that is just beautiful and applies wonderfully. I have yet to be disappointed with a sally hansen xtreme wear polish. This was just another hit!
So that is all of my polish picks for the month of May! Hope you all enjoyed this and maybe got some ideas for polishes to add to your collection! I will be back soon with more blog posts, and in the meantime, as I said above, be sure to check out my youtube channel! I would love to have you as a subscriber! I heart you guys all!
Subscribe to:
Posts (Atom)